Nicolet OMNIC Software
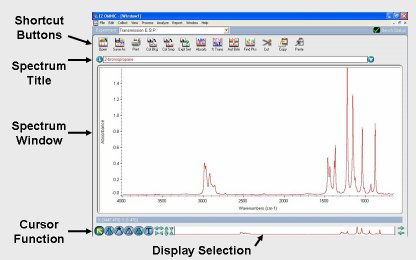
Our Nicolet Avatar FT-IR is controlled using OMNIC software. It is highly recommended that you take a few minutes to examine the OMNIC tutorial to get a better understanding of the software. The tutorial can be started by double clicking on the “OMNIC E.S.P Tutorial” icon on the Windows desktop. To start the data collection software click on the “EZ OMNIC” icon on the Windows desktop. Below is a screenshot of the OMNIC software. Click on a portion of the picture for a brief description.
Shortcut Buttons:
These useful shortcuts will save you some time navigating through the OMNIC menus. Particularly useful are the buttons to collect a new sample and collect a new background. Other buttons will change the display in the Spectrum Window.
Spectrum Title:
This pull-down list will allow you to see all of the active spectra and overlay multiple spectra in the Spectrum window. This is a very useful feature, but can result in a cluttered window unless you know where to find the “Hide Spectrum” command. Look in the “View” menu for this.
Spectrum Window:
Here’s where the action is. Pretty self explanatory.
Cursor Function:
Selecting a different cursor function will allow you to integrate peaks, add text to the spectrum, determine peak height and position, as well as other useful actions.
Display Selection:
This portion of the window displays the entire spectrum that has been collected or that has been stored in a file (typically from 400-4000 cm-1). By clicking and dragging on the vertical bars at the interface between the grey and white sections, you can easily change the region of the spectrum that you are viewing. You can also click and drag the entire white section along the x-axis to view a smaller portion of the spectrum.

