Operating Instructions for Abbé Refractometers
Author: J. M. McCormick
Last Update: August 11, 2009
Background
A refractometer is a device for measuring the index of refraction of a liquid sample, which is the ratio of light’s velocity in a vacuum to its velocity in the sample. The index of refraction can be measured very precisely; precisions up to ±0.00003 can be obtained, although most commercially-available instruments have a precision of ±0.0001. Since it is very sensitive to the sample’s composition, it is a very quick and easy way to the determine composition of a mixture if a set of standard mixtures can be prepared. The focus of this page is not to provide an exhaustive treatise on the theory of refractometry, and so the interested reader is referred to the literature for more information.1,2
Operation
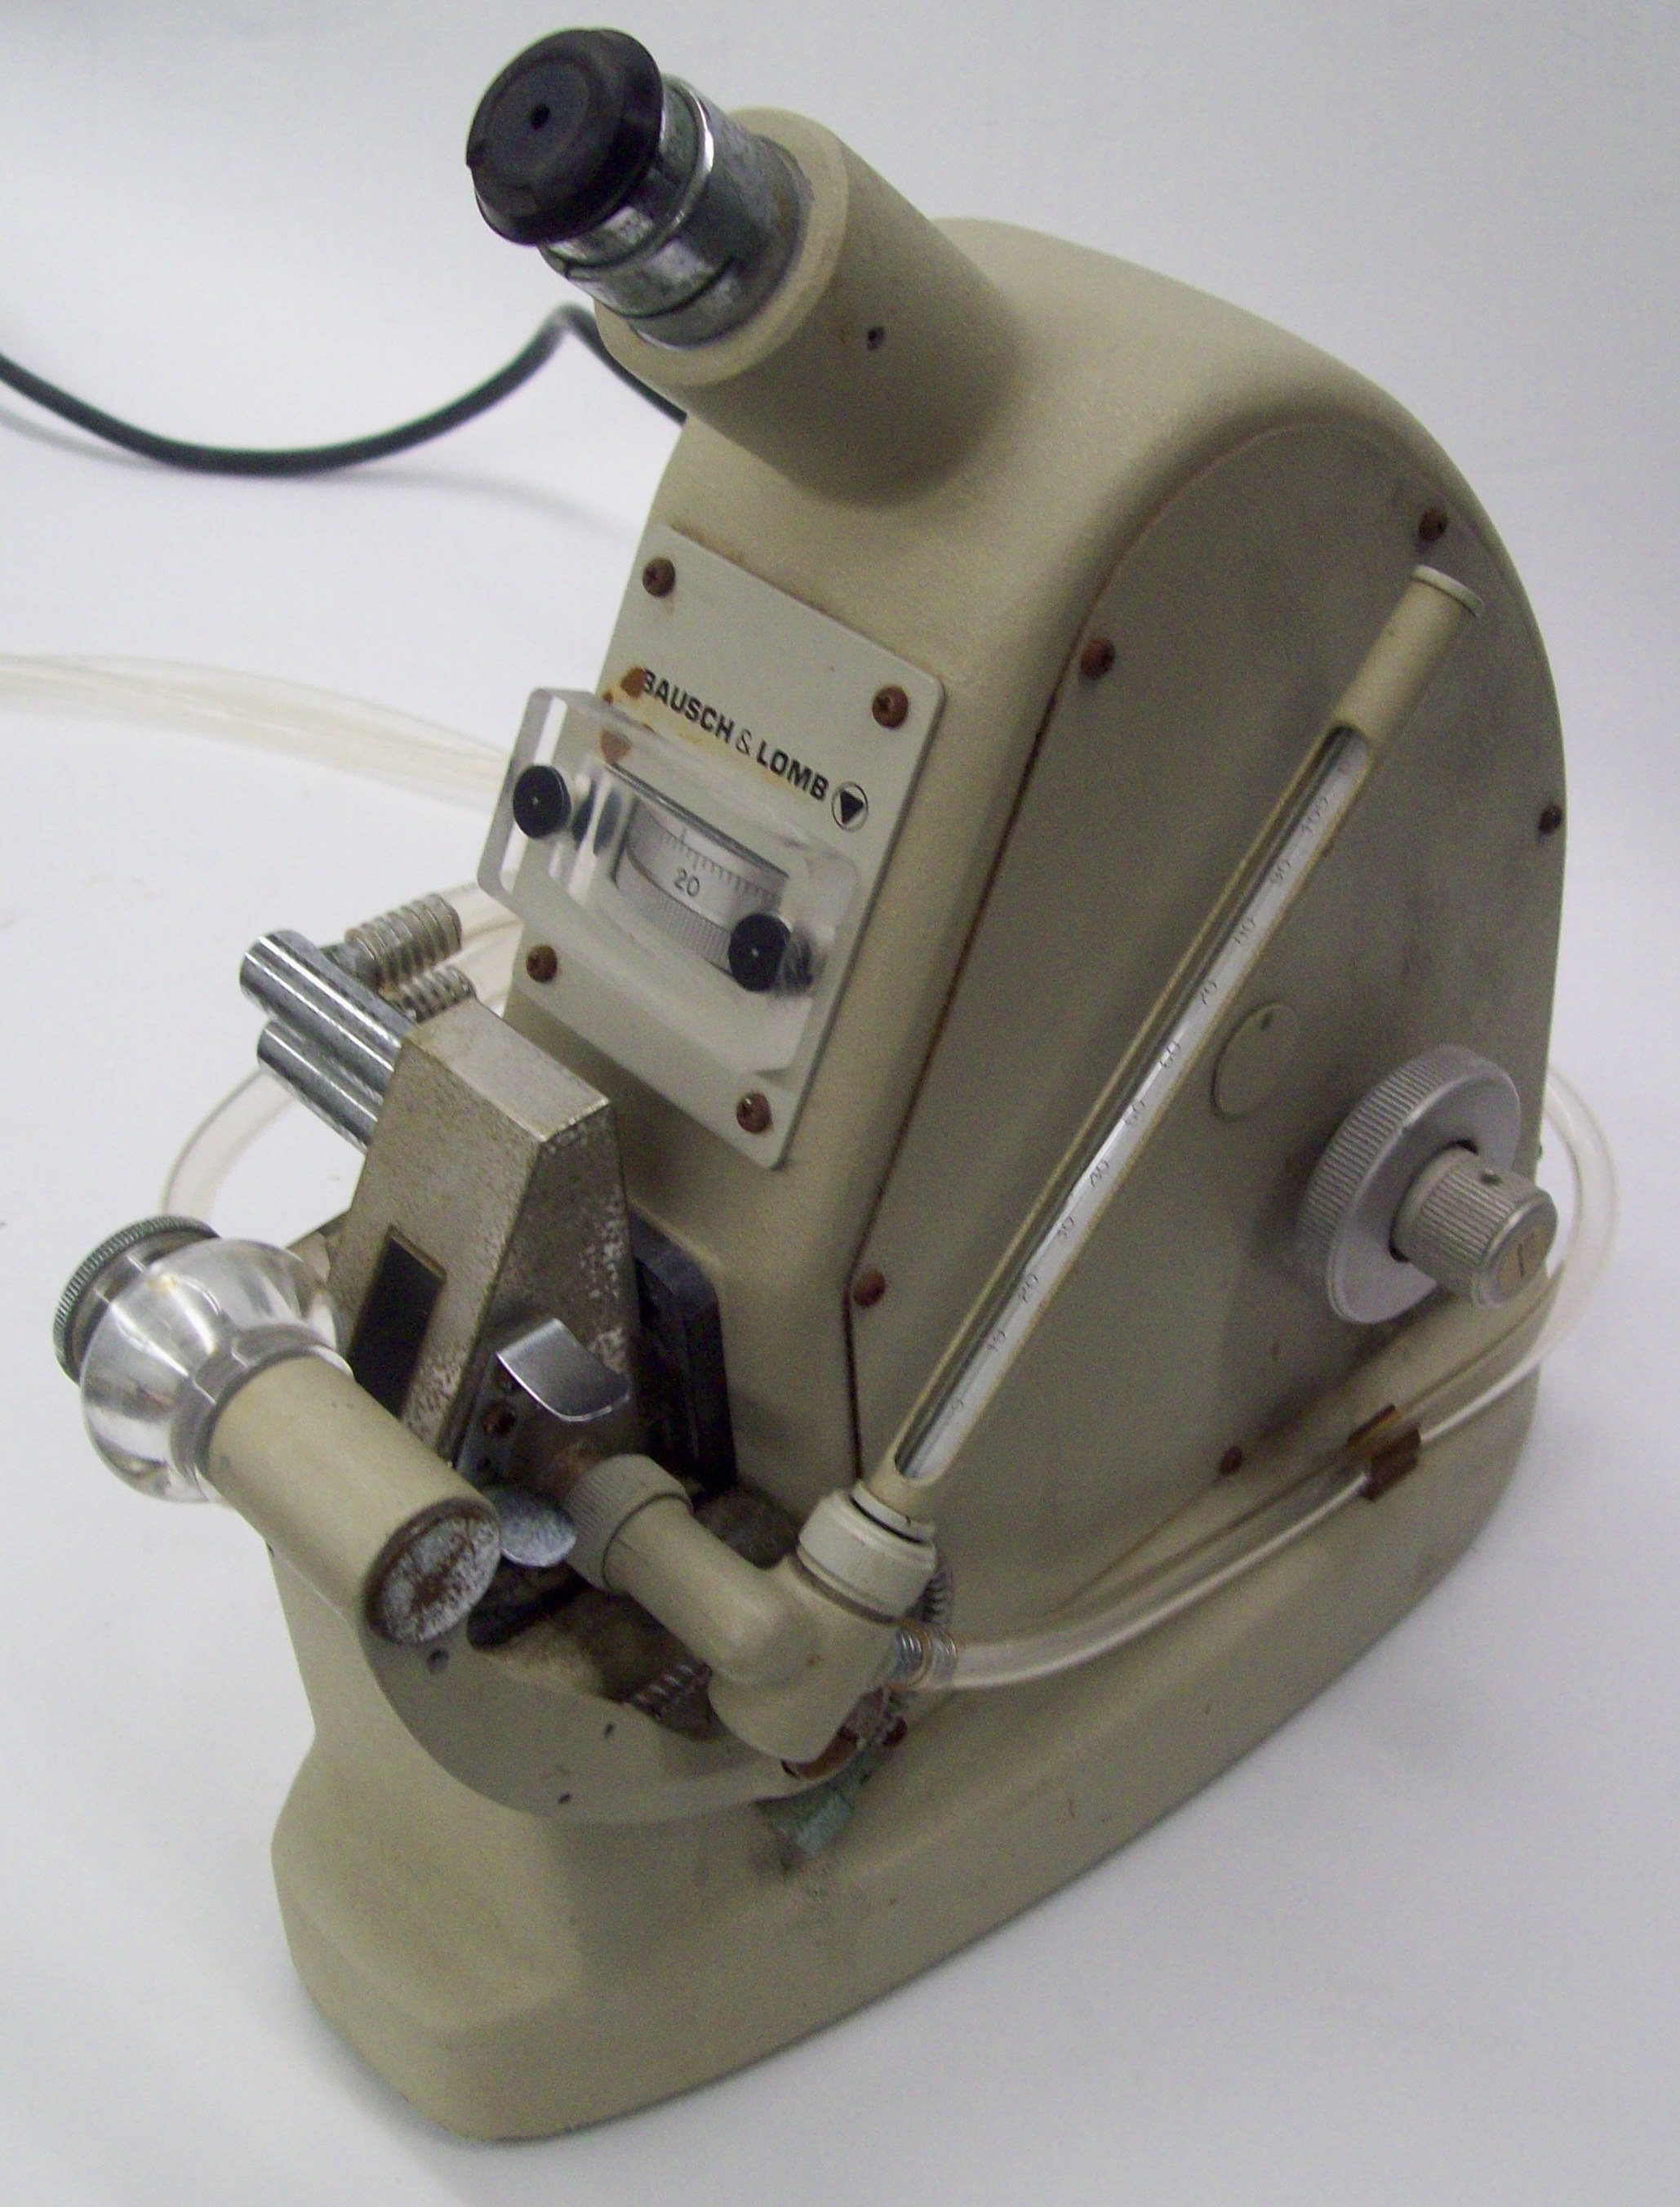
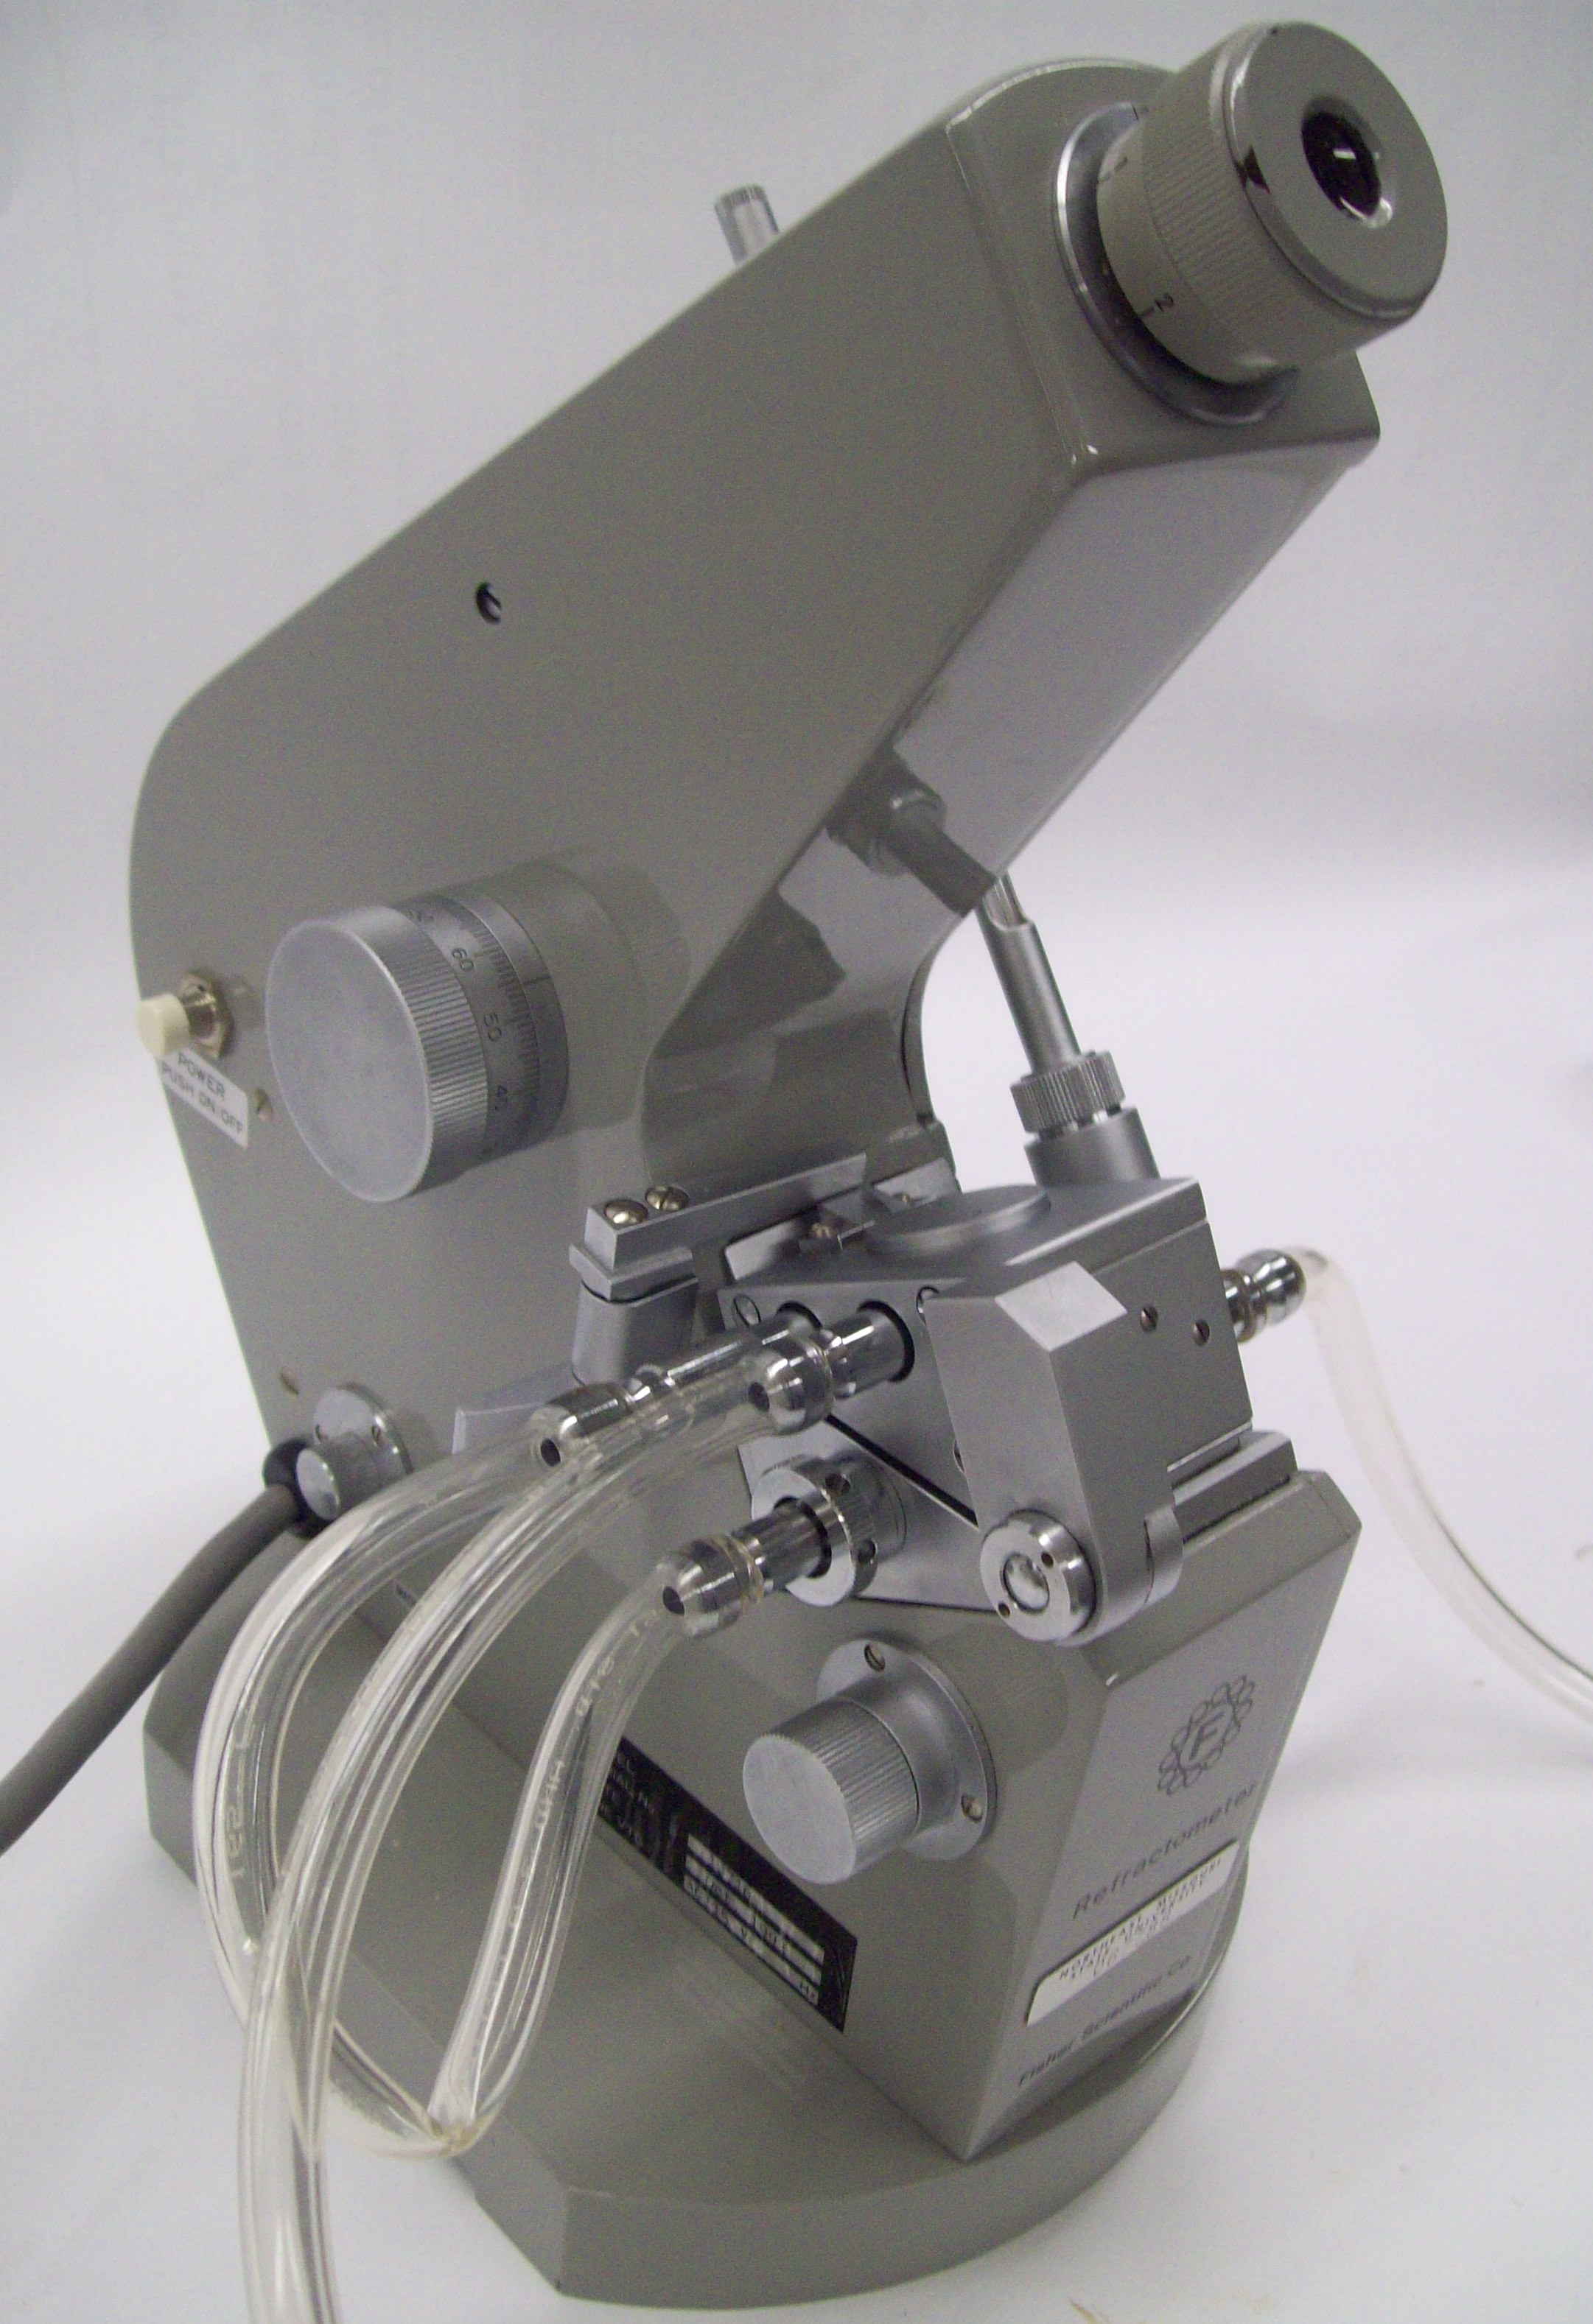
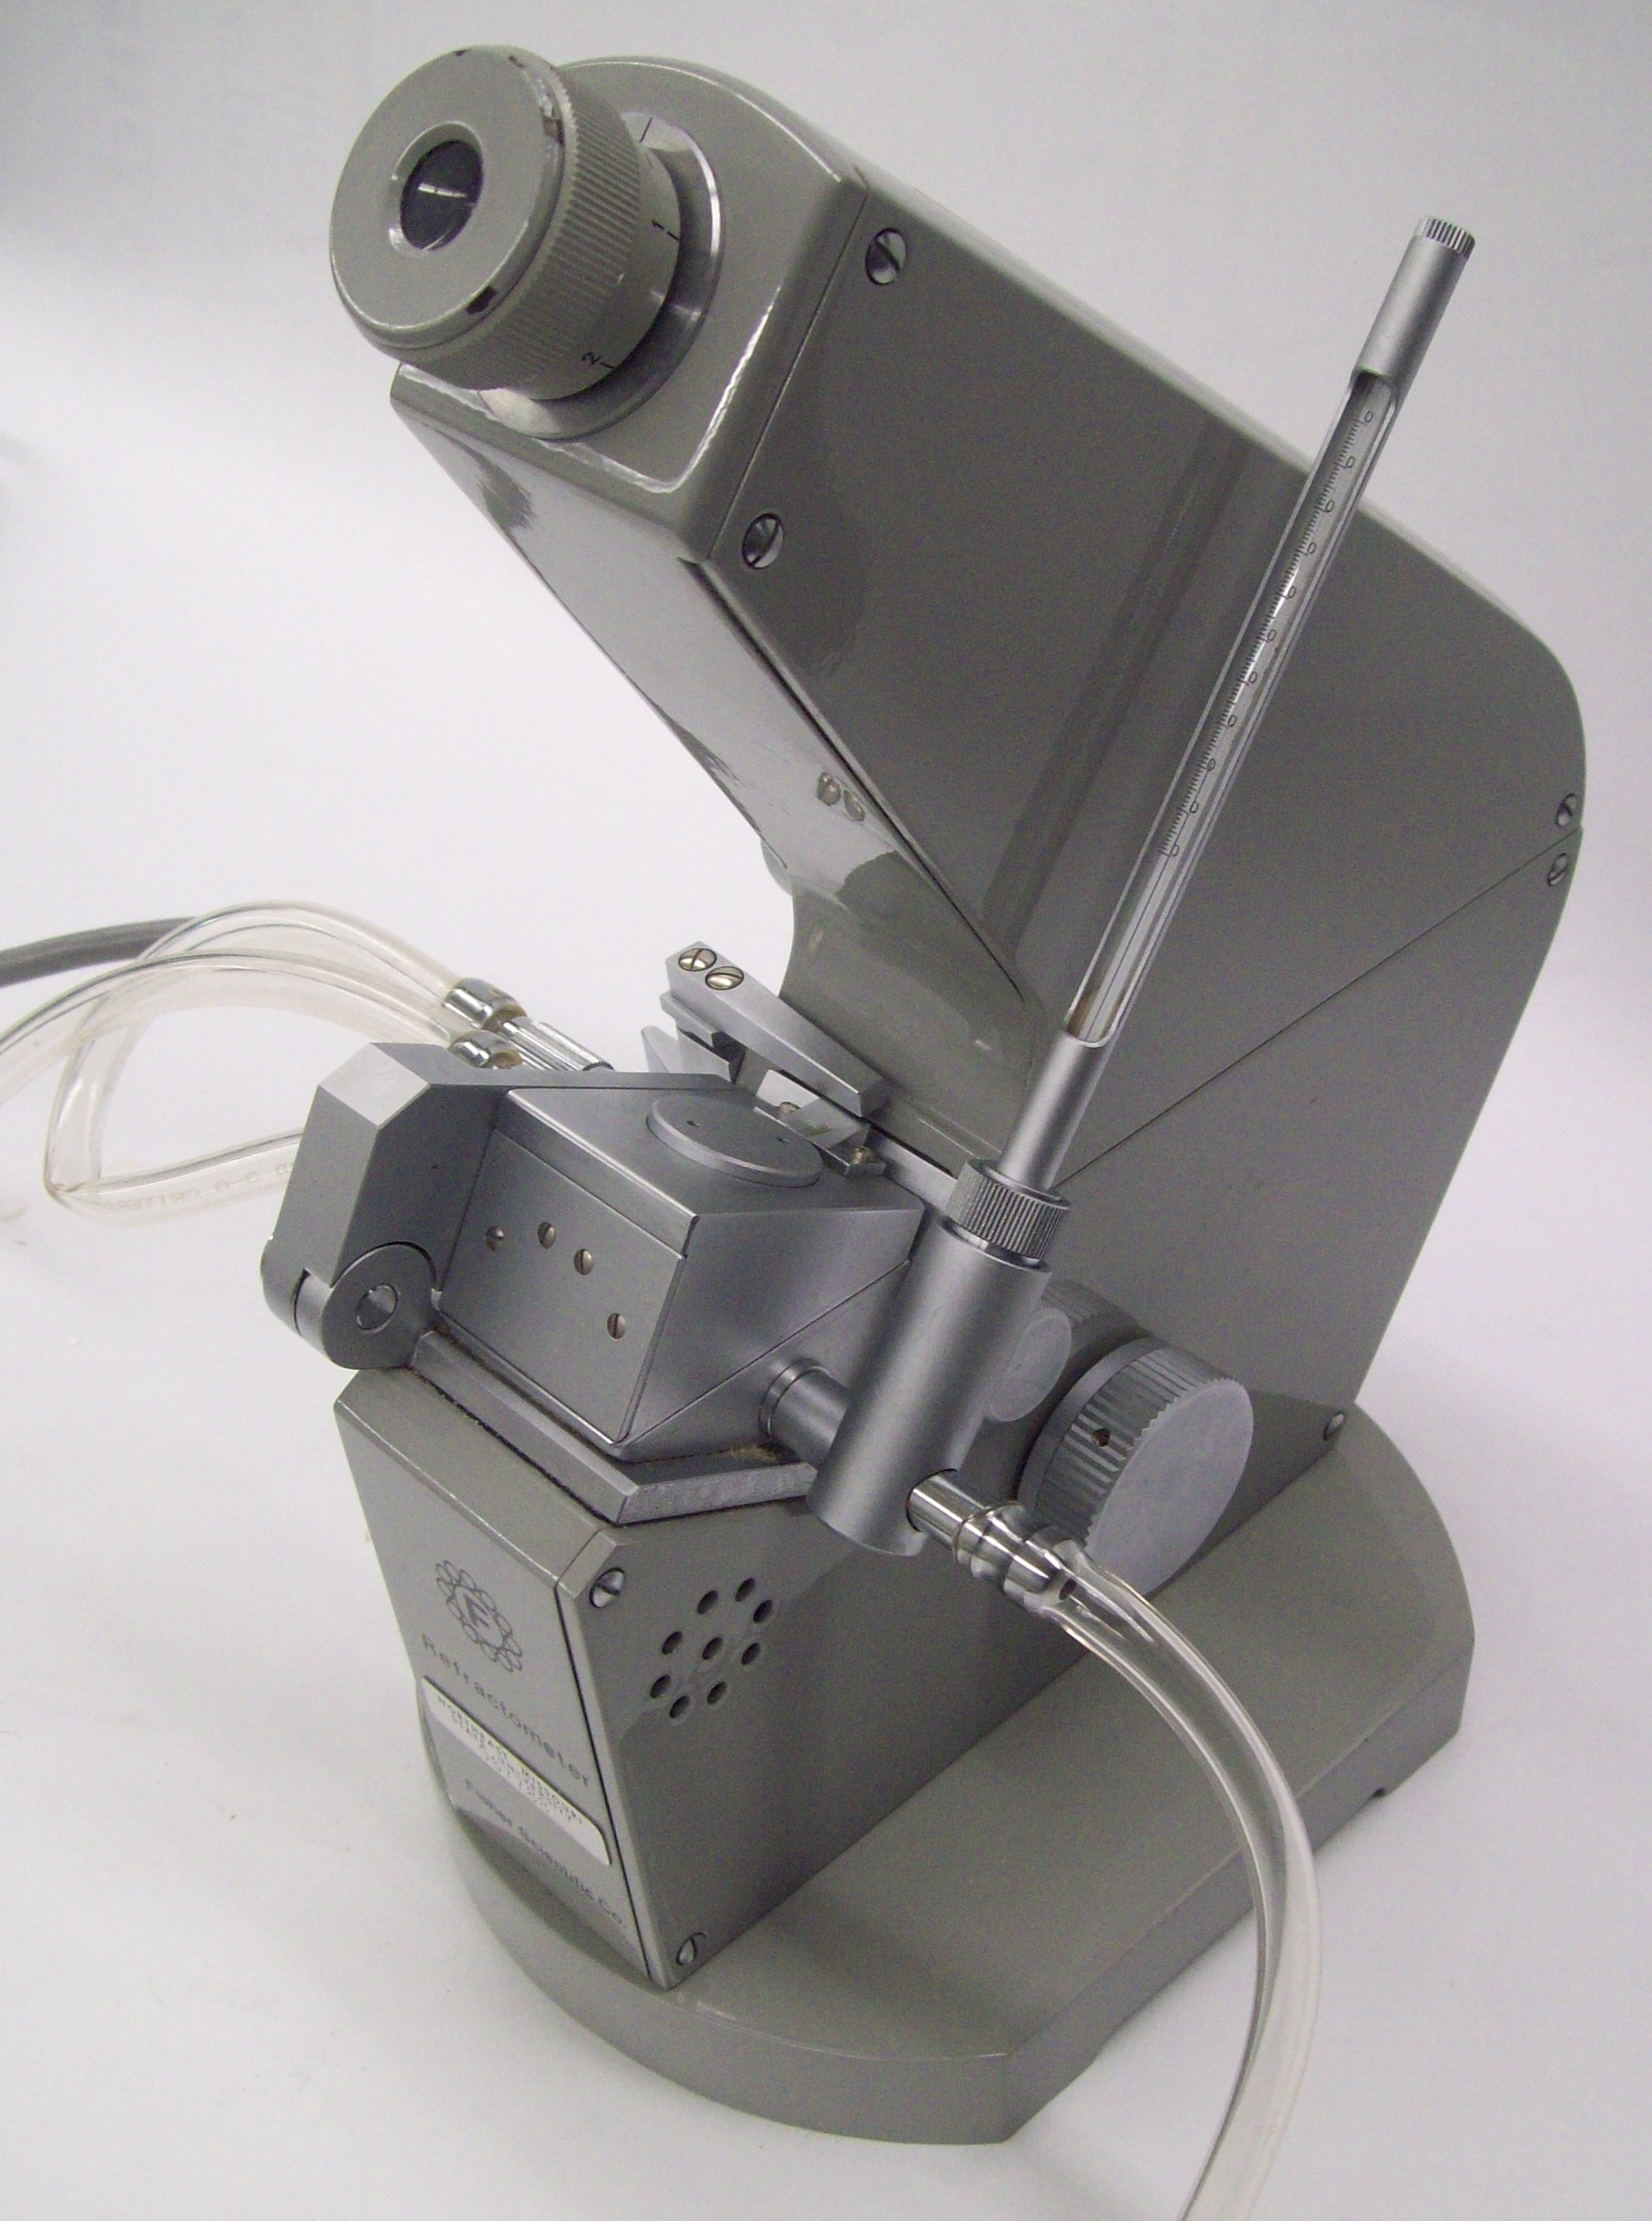
There are two refractometers available for your use; a Bausch and Lomb, shown in Fig. 1 and a Fisher, shown in Fig. 2. Although there are small differences in their operation, the basic principles and therefore the arrangement of the instruments’ components and the operating procedures are similar. This document will give a brief general overview of the operating procedure and will point out where the instruments differ in either control layout or in order of operations.

Figure 1. The Bausch and Lomb refractometer (right side view). On this instrument the compensator is a dial located on the front of the instrument (behind a protective plastic window in this view) below the eyepiece and above the sample stage. The prism coarse adjust and fine adjust knobs are the large and small knobs, respectively, located on the right side of the instrument. This instrument’s light source is external and is housed in the arm on the front of the instrument which can swing down and away from the sample stage. On this instrument the power switch is at the rear.
 |
 |
Figure 2. a) Left side view (left) of the Fisher refractometer showing the power switch (small white button) and the compensator knob (large knob). Note the presence of what appear to be knobs (one large one at the front and a smaller one at the rear) which are the bulbs for illuminating the sample and the scale. b) Right side view of the Fisher refractometer showing the prism adjusting knob. Unlike the Bausch and Lomb, the Fisher refractometer has only one prism adjusting knob. The light source for this instrument is internal, but it can be viewed through the vent holes on the right side just below the sample stage.
Before starting the instrument check that the water connections are tight, and that the sample stage is clean and dry. The following solvents and compounds cannot be analyzed on this refractometer: DMF; phenols, cresols and other tar acids; acetic acid solutions; N, N-dimethylacetamide; THF; mixtures of esters (especially methyl acetate and vinyl acetate); some lacquer thinners; strong mineral acids and bases.
If desired, turn on the water bath and set it for 20.0 °C. Allow the bath to warm up for several minutes before checking the thermometer on the side of the refractometer to verify that the proper temperature has been reached; adjust the temperature of the water bath as needed.
Turn on the refractometer (on the back of the Bausch and Lomb, or on the left side of the Fisher). If you are using the Bausch and Lomb, the light in the clear ball on the swing arm should come on, while you should observe light coming through the vent holes on the right front of the Fisher just below the sample stage.
To place a sample in the Bausch and Lomb, swing the light source out of the way (forward and down) and open the upper prism case (the metal case in the center of the instrument). For the Fisher, first disengage the sample stage latch and swing the upper prism assembly toward you. Place a drop of the sample on the sample stage and close the upper prism case. For the Bausch and Lomb move the light source into position, while for the Fisher simply close the latch. It is important that you do not use too much sample (which makes a mess and can decrease accuracy) or too little sample (which will result in a poorly defined borderline, vida infra).
If you know the sample’s approximate index of refraction, set the instrument to this value by adjusting the prism adjust knob (use the coarse adjust first on the Bausch and Lomb) while monitoring the index of refraction scale. To see the scale on the Bausch and Lomb, depress and hold the contact switch on the left rear of the instrument while looking through the eyepiece. This switch toggles between the two views shown in Fig. 3 (Fig. 3a is observed when the button is depressed, while Fig. 3b is observed when it is not). The scale should look like that shown in Fig. 3. On the Fisher refractometer both views are displayed simultaneously, as shown in Fig. 4. Once the you have made the coarse adjustment on the Bausch and Lomb, release the switch to view the boundary line (with the Fisher refractometer, you only need to shift your focus upward). If you do not know the approximate index of refraction, you can simply observe the position of the borderline and use the prism adjusting knob to bring the borderline to the center of the viewing field.
 |
 |
Figure 3. a. (left) The index of refraction scale (reading 1.4606), and b. (right) a properly focused and aligned borderline as seen through the eyepiece of the Bausch and Lomb refractometer.1
Figure 4. View through the eyepiece of the Fisher refractometer.3 In this view the index of refraction is 1.3330.
With the borderline near the center of view, adjust the compensator dial to remove any color (it may not be possible to remove all color). Focus the borderline sharply by adjusting the eyepiece. Bring the borderline into the crosshairs, as shown in Fig. 3b or Fig. 4, using the coarse (and fine) prism adjust knobs.
Read the index of refraction (by depressing and holding the switch on the left rear of the Bausch and Lomb, or directly on the Fisher), see Fig. 3a or Fig. 4. Three decimal places can be read directly from the scale; a fourth place can be estimated.
When you are finished measuring a sample, use a Kimwipe to dab away any remaining sample. Wash the sample stage with a small amount of wash acetone and gently pat dry. Close the upper prism case. The upper prism case should be closed at all times, except when a sample is being loaded or the sample stage is being cleaned.
At the end of the day, clean the sample stage, and close the upper prism case. Turn off the refractometer. Switch off the water bath, if it was used.
- 1. “Instructions for the Abbé-3L Refractometer”; Bausch and Lomb: Rochester, NY.
- 2. Garland, C. W.; Nibler, J. W. and Shoemaker, D. P. Experiments in Physical Chemistry, 8th Ed.; McGraw-Hill: New York, 2009, p. 613-617.
- 3. “Fisher Abbé Refractometer Instruction Manual”; Fisher Scientific: Pittsburgh, PA, 1993.
