Enthalpies of Solution1
Authors: B. D. Lamp, T. Humphry, V. M. Pultz and J. M. McCormick*
Last Update: November 13, 2013
Introduction
Thermochemistry Background
Thermochemistry investigates the relationship between chemical reactions and energy changes involving heat. It was born out of the practical problem of cannon making and today continues to play an important role in almost every facet of chemistry. Practical applications of thermochemistry include the development of alternative fuel sources, such as fuel cells, hybrid gas-electric cars or gasoline supplemented with ethanol. On a fundamental level, thermochemistry is also important because the forces holding molecules or ionic compounds together are related to the heat evolved or absorbed in a chemical reaction. Therefore, chemists are interested in the thermochemistry of every chemical reaction, whether it be the solubility of lead salts in drinking water or the metabolism of glucose.
The amount of heat generated or absorbed in a chemical reaction can be studied using a calorimeter. A simplified schematic of a calorimeter is shown in Fig. 1. The “system” (our chemical reaction) is placed in a well-insulated vessel surrounded by water (surroundings). A thermometer is used to measure the heat transferred to or from the system to the surroundings. Ideally, only the water would be the “surroundings” in the thermodynamic sense, and the vessel would not allow heat to pass. In reality, the vessel does allow heat to pass from the water to the rest of the universe, and we will need to account for that (vide infra).
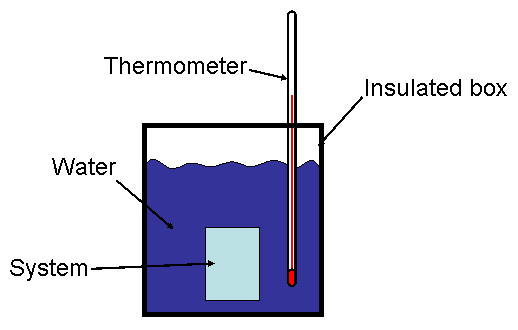 Figure 1. Schematic representation of a calorimeter.
There are two types of calorimeters: constant-pressure and constant-volume.2,3 In the constant-volume calorimeter, the chemical reaction under study is allowed to take place in a heavy-walled vessel called a bomb. Because the reaction in the bomb takes place at constant volume, the heat that is generated by the reaction (mostly exothermic reactions are studied in a constant volume calorimeter) is actually the change in the internal energy (ΔU) for the reaction. Although ΔU is a useful quantity, for chemists the change enthalpy (ΔH) is more relevant. However, we can convert ΔU to ΔH using Eqn. 1, if we know the change in the number of moles of gas (Δn) in the reaction and the temperature (T).
|
ΔH = ΔU + Δn·R·T |
(1) |
In a constant-pressure calorimetry experiment, like the one that you will be performing, the energy released or absorbed is measured under constant atmospheric pressure. A constant-pressure calorimeter is simpler to assemble than a constant-volume calorimeter and a wider range of chemical reactions can be studied with it. Also, because the reaction is run at constant pressure, ΔH is equal to the amount of heat a reaction generates or absorbs (More Info) and one need only measure the temperature change when the reactants are mixed to obtain ΔH for the reaction.
Constant-pressure calorimetry is normally conducted with liquids or solutions that have the same temperature (More Info). When a solid is used, it is usually assumed that the solid’s Tinitial is the same as the ambient temperature. After the Tinitial measurement is made, the reactants are quickly placed into the constant-pressure calorimeter. If the reactants mix and react instantaneously, and the thermometer responds perfectly to the change in temperature, the change in the temperature (ΔT) would simply be Tfinal – Tinitial, as shown in Fig. 2. Note that if the calorimeter is perfect (no heat leaks) the temperature inside the calorimeter will not change, and the graph of temperature as a function of time will be flat, also as shown in Fig. 2.
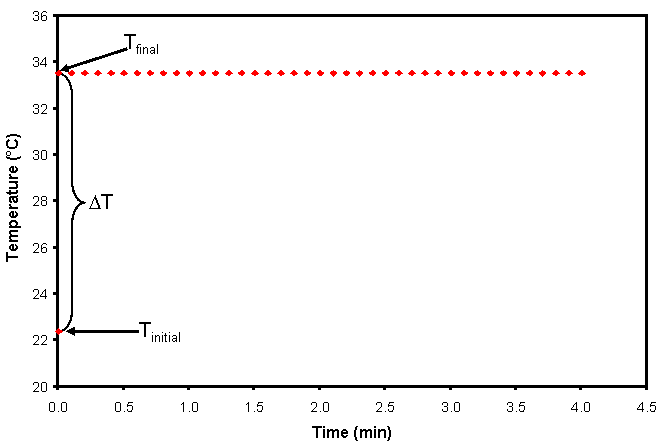 Figure 2. Graph of temperature as a function of time for an exothermic reaction in a perfect calorimeter.
Unfortunately, no calorimeter is perfect, and instantaneous mixing and reaction are not always achieved (even with efficient mixing). In this case, the graph of temperature as a function of time looks more like Fig. 3. We can still find ΔT, but now we must extrapolate back to when the solutions were mixed (time, t, equals zero). This is most easily done by performing a linear regression on the sloped portion of the graph (where, for exothermic reactions, heat is leaking out of the calorimeter) and obtaining Tfinal from the y-intercept.
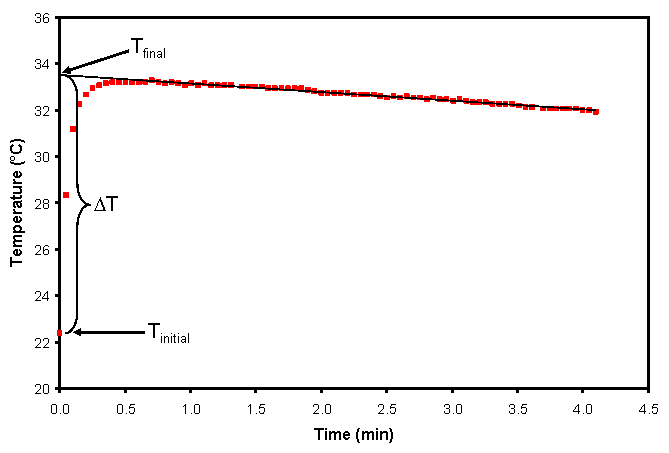 Figure 3. Graph of temperature as a function of time for an exothermic reaction in a real calorimeter showing extrapolation back to the ideal Tfinal at the time of mixing (t = 0).
Some other experimental problems with real calorimeters that we need to account for are: 1) real calorimeters can absorb heat, and 2) although the species that undergo the chemical change result in a release/absorption of thermal energy, it is the entire solution that changes its temperature. Luckily both of these problems can be accounted for by measuring a calorimeter constant, C, which is essentially a specific heat capacity for the calorimeter and everything in it (with units of J·g-1·°C-1). As long as we work with dilute aqueous solutions and the nature of the solutions does not change significantly from one experiment to another (e.g., the solutions are all dilute and aqueous), the calorimeter constant may be used for many different experiments in the same calorimeter. The calorimeter constant is most easily determined by performing a reaction with a known enthalpy change (ΔHrxn). For this exercise we will use the neutralization reaction HCl (aq) + NaOH (aq) → H2O (l) + NaCl (aq) to determine the calorimeter constant (Help Me).
To relate ΔHrxn to the calorimeter’s temperature change, we need to use the First Law of Thermodynamics. The heat that the chemical reaction puts out, or takes up, (qrxn) is simply the moles of the limiting reagent, nlimiting reagent times ΔHrxn (recall that this is how an enthalpy change was defined), as given by Eqn. 2.
|
qrxn = nlimiting reagent·ΔH |
(2) |
The solution (including the reactants and the products) and the calorimeter itself do not undergo a physical or chemical change, so we need to use the expression for specific heat capacity to relate their change in temperature to the amount of heat (qcal) that they have exchanged (Eqn. 3). In Eqn. 3, m is the mass (mass of the reactants + mass of water + mass of calorimeter), C is the calorimeter constant (specific heat capacity) and ΔT is the change in the temperature of the solution (and calorimeter).
|
qcal = m·C·ΔT |
(3) |
By the First Law of Thermodynamics, qrxn must be equal in magnitude to qcal, but opposite in sign (if the reaction gives off heat, the calorimeter must take it in). This leads to Eqn. 4, which is the starting point for all of the calculations in this exercise. It is then simply a matter of algebraic manipulation to put it in the form that we need (either solve Eqn. 4 for C, when we are determining the calorimeter constant, or for ΔH when we are trying to find the enthalpy change for a salt dissolving in water, ΔHsol).
|
nlimiting reagent·ΔH = -m·C·ΔT |
(4) |
Periodic Trends
Trends related to the positions of the elements on the periodic table are a well-established fact. There are vertical trends, horizontal trends, and some properties can trend both ways. Atomic size is an example of a trend. Generally, the lower in a group an element is, the larger it is, so a potassium atom is larger than a sodium atom. Also, the farther right in a row an atom is, the smaller it tends to be, so a carbon atom is smaller than a sodium atom.
In this exercise, calorimetry will be used to investigate whether there is a periodic trend in the enthalpies of formation for the common cations of some metallic elements in aqueous solution. The formation of an aqueous cation from an element in its standard state is a fairly abstract multi-step process, but it relates directly to the oxidation-reduction reactivity of the element and to the solubility of ionic compounds. So, this is an important chemical process!
Each salt investigated in the lab has a metallic cation. Using the known ΔHf0 of the solid inorganic salt (including any waters of hydration) and the known ΔHf0 of the aqueous anion (from the following table), the ΔHf0 of the aqueous cation can be calculated using the dissolution equation of the salt and the enthalpy of dissolution measured in the experiment. For example, the dissolution equation for aluminum chloride hexahydrate is AlCl3·6H2O (s) → Al3+ (aq) + 3 Cl– (aq) + 6 H2O (l). The ΔHf0 of the Al3+ ion can, therefore, be found from the ΔHf0 of the other species present in the reaction and the ΔHsoln found experimentally. Note that in this example the water changes from being bound in the aluminum chloride crystal lattice to being free liquid water. There is an enthalpy change associated with this process! So, it is important to know whether the solid salt is a hydrate or not, and if so, how many waters are present.
If a periodic trend in the enthalpy of formation of the aqueous cation is present down a column or across a row, it should become apparent from the results. In order to visualize any periodic trend in ΔHf (if there is one), it is helpful to write the enthalpies of solution out on a periodic table. If no trend is present, that should also be readily apparent.
Before coming to the laboratory be sure that you have determined ΔHrxn for the reaction of aqueous HCl with aqueous NaOH using the tabulated ΔHf0 (you might find this reaction’s net ionic equation, H+ (aq) + OH– (aq) → H2O (l), an easier way to calculateΔHrxn). It is highly advised that you have set up all of the equations that you will need during the laboratory in your notebook before lab. The main cause of people not finishing this exercise on time is being ill-prepared!
Calorimeter Setup
In this experiment, you will use a computer-based data collection system to record solution temperature as a function of time, and a magnetic stirrer to ensure mixing of reagents (see experimental setup in Fig. 4 and Fig. 5). Before beginning, read the introduction to Logger Pro to learn how to assemble the computer and data acquisition system. You will be using stainless steel temperature probes; one in channel 1 of the LabPro interface and the other in channel 2. Set the software to collect data every second for 4 minutes (240 sec) and adjust the displayed precision to two decimal places (Help Me). Your instructor will assist you in setting up the data collection system and running the software.
Figure 4. LabPro setup for this experiment showing temperature probes on both channel 1 and channel 2.
Figure 5. Experimental setup of the constant-pressure calorimeter (shown without the cover in place).
Determination of the Calorimeter Constant
Measure and record the mass of a clean, dry Styrofoam cup. Place a dry magnetic stir bar in the cup and record the new mass. This cup will be your calorimeter for the day. Do not change cups! Otherwise, you will need to re-determine the calorimeter constant for the new cup.
Measure 50.0 mL of ~2 M NaOH with your graduated cylinder and place it into the cup. Assuming the solution has a density of 1.00 g/mL, determine the mass of the solution. Record the mass of the cup and the solution it contains in your notebook. Do NOT place a wet cup or a cup filled with liquid on the balance! Helpful hint: use the density and the volume to calculate the mass. Doing so can cause severe damage to the balance. Be sure that you also record the molarity of the NaOH used in your notebook. Calculate and record the number of moles of NaOH used.
Place 51.0 mL of ~2 M HCl in another clean, dry coffee cup. Again, assuming the density of the HCl solution is 1.00 g/mL, determine the mass of the solution that was used. DoNOT place a wet cup or a cup filled with liquid on the balance! Rather, use the solution’s density and volume to find mass. Record the molarity of the HCl used. Calculate and record the number of moles of HCl used. Determine whether NaOH or HCl is the limiting reagent.
Assemble the calorimeter apparatus, as shown in Fig. 5, by positioning the cup containing the NaOH solution and stir bar on the magnetic stirrer. Your instructor will assist you in positioning the cover, if needed. Begin gently stirring the solution (a setting of 1 or 2 on the magnetic stirrer is a good starting point).
Rinse the channel 1 temperature probe with distilled water into a beaker and pat dry with a KimWipe®. Place the probe in the cup being careful that the stir bar does not strike the probe. Gently clamp the temperature probe in place. Rinse the channel 2 temperature probe and then place it in the HCl solution. CAUTION! The temperature probe should not sit in the HCl solution for longer than one minute. If the probe stays in an acidic solution any longer than this, the steel will be irrevocably corroded. The LoggerPro software will display the temperature of both solutions in real-time in the upper left-hand corner of the window. Monitor the temperatures over the next several minutes. While the temperatures are equilibrating, make sure that the LoggerPro software is ready to start recording data. When the temperatures of the NaOH and HCl solutions no longer change, record the temperature of each. Calculate the average of the two temperatures, which will be Tinitial of the mixture. Remove the probe from the HCl solution and rinse it well with distilled water into a waste beaker.
Move the cover to the side and then rapidly, but carefully, pour as much of the HCl solution as possible into the calorimeter and simultaneously initiate data collection in LoggerPro. Slide the cover back into place. While continuing to stir, record the solution’s temperature every second over the next 4 minutes. By default, LoggerPro will construct a graph of temperature versus time as your data is being collected. The program will collect data from both probes, but only the channel 1 probe will change, and it will be the only one that we will analyze. Note that for clarity the signal from channel 2 has been omitted in all figures shown below.
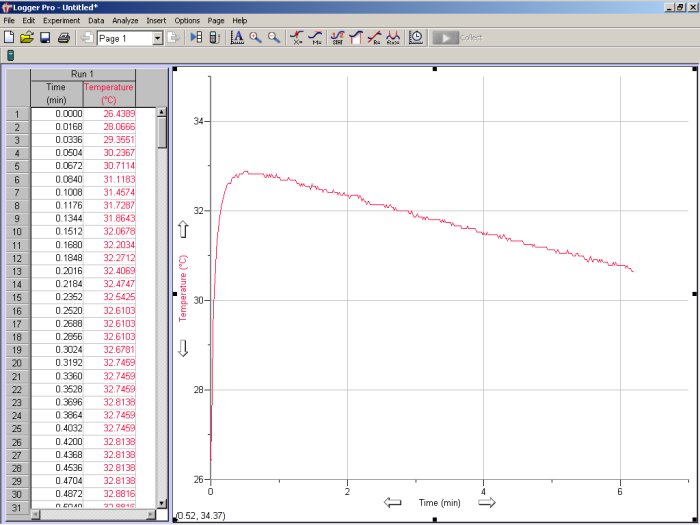 Figure 6. Typical trace of temperature as a function of time for an exothermic as recorded by the LoggerPro software. Note that data from only one channel is shown.
The trace shown in Fig. 6 is fairly typical for an exothermic process, where the temperature of the solution rises rapidly before slowly diminishing as the system returns to room temperature. Since the temperature probe cannot respond instantaneously to a rapid change in temperature and the reaction may not take place instantaneously, the first portion of the data may exhibit some curvature before reaching a maximum. However, the data to the right of the curve’s maximum should be fairly linear. Use the linear fit icon (![]() ) to draw the best-fit line extending it back to the time of mixing, i.e., time = 0 min (see Fig. 7). The ideal final temperature of the mixture, Tfinal, is the temperature given by the best-fit line at the time of mixing. If you determine a best-fit linear line based on data to the right of the curve’s maximum, the intercept is Tfinal. Calculate the ideal temperature change ΔT = Tfinal – Tinitial. Note that if two channels are being monitored, you will be prompted to specify which channel to analyze (select channel 1 if you have set up the experiment as described above).
) to draw the best-fit line extending it back to the time of mixing, i.e., time = 0 min (see Fig. 7). The ideal final temperature of the mixture, Tfinal, is the temperature given by the best-fit line at the time of mixing. If you determine a best-fit linear line based on data to the right of the curve’s maximum, the intercept is Tfinal. Calculate the ideal temperature change ΔT = Tfinal – Tinitial. Note that if two channels are being monitored, you will be prompted to specify which channel to analyze (select channel 1 if you have set up the experiment as described above).
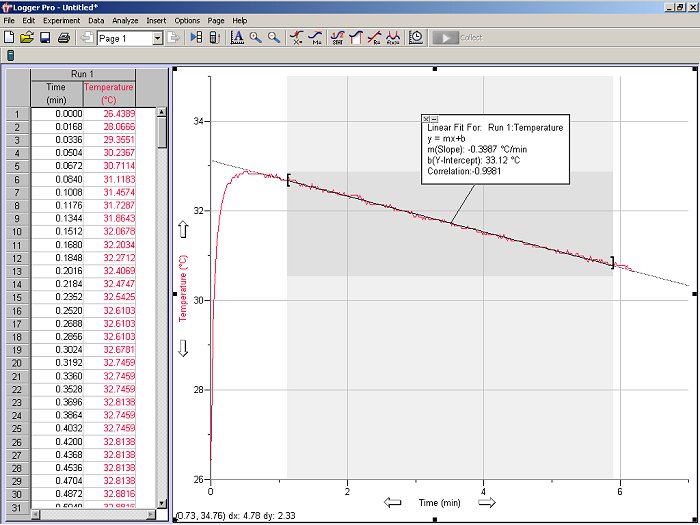 Figure 7. Same data as shown in Fig. 6, but now with the results of the linear regression shown. As in Fig. 6, data from only one channel is shown.
Determine the total mass of the calorimeter, m (includes the mass of the cup and everything in it), by adding the mass of the dry cup and stir bar, the mass of HCl and the mass of NaOH . Using the total mass, ΔHrxn, moles of the limiting reagent, and ΔTcalculate the specific heat capacity of the calorimeter, C.
Use the Store Latest Run command in LoggerPro to prevent overwriting of your data. This will write the file that only LoggerPro can read. To save your file in a format that Excel can read. Do this by selecting File, Export As from the menu bar and then select the Text option. Save your data to your Y: drive, or other removable data storage device. Record the file name in your notebook.
Repeat the above procedure twice more. Calculate an average specific heat capacity of the calorimeter and its associated 95% confidence interval.
Determination of a Heat of Solution
In this portion of the experiment, you will use the calorimeter from the previous portion to determine the heat of solution (ΔHsoln) for an inorganic salt. Your specific salt will be assigned by your instructor in the laboratory; all measurements are to be conducted using your assigned salt. Since you will not be using the second temperature probe, you can disconnect it.
Clean and dry the coffee cup that you used for the calorimeter in the first part. Place 50.0 mL of distilled H2O in the cup. Assuming the water has a density of 1.00 g/mL, determine the mass of distilled water used. Do NOT place a wet cup or a cup filled with liquid on the balance!
Assemble the calorimeter apparatus, insert the magnetic stir bar and begin gentle stirring. Rinse the channel 1 temperature probe with distilled water and pat dry. Place the probe in the water, as you did before, and note the temperature of the water over the next several minutes. When the temperature no longer changes, record it as Tinitial.
Grind your assigned salt to a fine powder with a clean, dry mortar and pestle. Place approximately 2.0 g of the powdered salt into a clean, dry weigh boat and record the mass. The salt should be at room temperature, which we will assume is the same as the temperature of the water.
Begin stirring the water in the calorimeter. This should be fairly vigorous, but not so vigorous that water splashes out of the calorimeter or there is excessive cavitation in the water. Slide the cover out of the way, initiate data collection and then rapidly, but carefully, add the salt to the stirring water in the calorimeter. Slide the cover back over the cup’s mouth. While continuing to stir, record the solution’s temperature every few seconds over the next 15 minutes. The time required to obtain the maximum/minimum temperature may be as short as 5 minutes and as long as 40 minutes (if the sample was not ground finely enough); adjust your acquisition parameters as required. LoggerPro will again construct a graph of temperature versus time based on your data. The appearance of your data will depend on how exothermic or endothermic the dissolution of your salt is. As with the HCl/NaOH data, draw the best-fit line through the data points which are approaching room temperature. The ideal final temperature of the mixture, Tfinal, is the temperature where the best-fit line crosses the time of mixing. If your data looks really strange, you might approximate Tfinal by the lowest temperature, for an endothermic reaction, or the highest temperature, for an exothermic reaction, that is achieved. Calculate ΔT.
Using the total mass of the solution (mass of cup and stir bar from first part, mass of water added and mass of salt) m, the number of moles of solute, ΔT, and the previously established specific heat capacity of the calorimeter, calculate the heat of solution,ΔHsoln for your salt.
Store the latest run and repeat the analysis of your salt two additional times (don’t forget to save your data!). Calculate the average ΔHsoln, with its associated 95% confidence interval for your salt. Before you leave the laboratory, report your results to the rest of the class. Copy one run each for the HCl/NaOH and ΔHsoln portions of the experiment into Excel and include a printout of a plot of each dataset in your notebook.
Results and Analysis
Determination of the Calorimeter Constant
Determine the average C for your calorimeter from your three runs. Determine the estimated standard deviation and the 95% confidence interval for C. You will use the average C in your calculation of ΔHsoln, but we will not do a propagation of error analysis.
Determination of a Heat of Solution
From your three runs determine an average ΔHsoln for your salt. Also calculate the estimated standard deviation and the 95% confidence interval for ΔHsoln. Report yourΔHsoln and its 95% confidence interval to the class. From your ΔHsoln and the tabulated ΔHf0, determine ΔHf0 for the cation in the salts. Be careful how you write the reaction that describes the salt dissolving (hydrates are different than anhydrous salts!). There is no need to propagate the uncertainty here (so there will be no confidence interval on ΔHf0for the cations).
Conclusions
For your conclusions use the outline for a measurement exercise. Examine class data as a whole. Do you see any trends (for example, how does ΔHf0 for the cations change as a function of an element’s place on the periodic table)? Predict ΔHf0 for the cations that were not studied (Rb+ and Sr2+). Evaluate whether your results are likely to be accurate, based on the uncertainty in the measurements that you and your classmates made.
Model your Summary Table after Table 1, below.
| Salt | ΔHsoln(kJ/mole) | ΔHf0 (kJ/mole) for Cation |
Table 1. Example of the Summary Table for this exercise. Fill in your values, and remember to include the 95% confidence interval for each ΔHsoln.
References
1. Click here to obtain this file in PDF format. Note that hyperlinks are not active in the pdf version. 2. Zumdahl, S. S. Chemical Principles, 4th Ed.; Houghton-Mifflin: New York, 2002; chapter 9. 3. Atkins, P. Physical Chemistry, 6th Ed.; W. H. Freeman: New York, 1998; chapters 2 and 3.
